What a Flop!

As I’m learning about the complexity of sourdough, I’ve had some great outcomes, many of which I’ve photographed and posted. But I’ve also had a LOT of failures. It’s all part of the learning process.

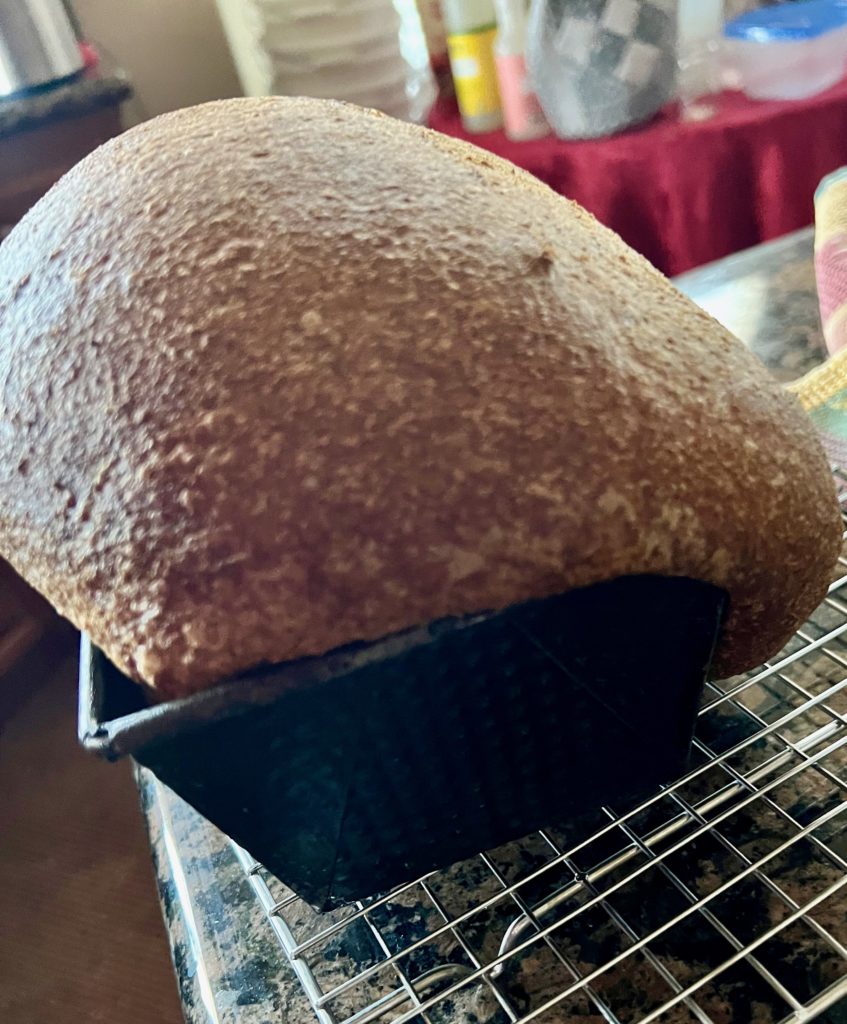
This post is about one colossal flop that I believe was due to over proofing, or over fermentation.

My goal for many of the recipes I use is to find or convert recipes with at least a 7-8 hour ferment that can be left out on the counter overnight and then shaped and baked in the morning. This timing works well for my schedule, and almost all of the recipes I’ve posted here follow this pattern: 1. Take the starter out of the refrigerator and feed the starter at least three times (6 plus hours in between) before mixing the recipe. 2. Mix the dough recipe or at least all of the flour for the recipe the evening before I want to bake. This allows a bulk fermentation for all of the flour so that the process can work on the carbs for at least 7 hours (per Trim Healthy Mama [THM] guidelines). 3. In the morning shape the dough and place it in the pan. 4. Usually there is a short second rise of about an hour till the dough just rises above the pan rim. 5. Bake the bread/rolls/bagels as directed.

I love the soft whole wheat sandwich loaf (see my post on this recipe from Baking a Moment elsewhere https://bakingamoment.com/soft-whole-wheat-bread/) and bake it almost weekly for morning toast. Well this particular morning I had multiple meetings and had to navigate around them for baking time. I allowed the dough to rise in the pan not one hour but more than two and it was just over proofed. I read through other sour dough blogs and have gathered that was the problem.

Here’s a fed starter ready to go! Looks like it needs a larger container!
The bread dough rose too much and then fell over the side of the pan in the oven.
It didn’t have the strength to rise straight up.
I trimmed off the part that fell over the pan and was able to slice the loaf as usual. Looked funny but tasted great!

Sourdough Cornbread

Trim Healthy Mama (THM) a diet plan I follow loosely, recommends cornmeal in very small amounts in the form of Masa Harina. Brianna Thomas is a blogger I rely on for great recipes

Gwen’s Nest is another blogger with great recipes that are THM friendly

Glenda Groff is another blogger with great THM and sourdough recipes

But I wanted to try to sour through the use of sourdough starter the cornmeal and see how that worked. I’m using the recipe of Shannon Stonger from her book Traditionally Fermented Foods and her blog Nourishing Days.

https://www.nourishingdays.com/

Here is her recipe:

Ingredients

  • 1 cup sourdough starter
  • 2 cups whole grain cornmeal
  • 2 cups milk
  • 3 eggs, beaten
  • 2 tablespoons honey
  • 2 tablespoons melted butter (or bacon grease)
  • 2 teaspoons baking powder
  • 1/2 teaspoon baking soda
  • 1 teaspoon salt

I mixed the sourdough starter, cornmeal, and milk the night before and let it ferment for 24 hours. I substituted my homemade yogurt for the milk. In the evening I mixed in the other ingredients and baked in a cast-iron skillet. Here’s the results, soft, almost cake-like that went great with beans.

Bagels!

A classic breakfast bread that can ‘do lunch’ too with the addition of smoked salmon and veggies or other sandwich fixings is on everyone’s favorites list. I ate my first bagel when I was a young adult visiting a nursing conference, and bagels and cream cheese with strawberry jam were served. I still think that’s the best way to eat bagels. While I was eating bagels with cream cheese, a very young Steven was tasting his first chocolate M & M with his grandma, but that’s another story…

Sourdough bagels might sound intimidating but they are super easy and straightforward. The recipe I used is from Little Spoon Farm, one of my favorite sourdough blog siteshttps://littlespoonfarm.com/sourdough-bagels-recipe/

This is an overnight recipe and fits my schedule perfectly. Mix up the dough with active starter. That means you have fed the starter out of the refrigerator about 3 times and it is bubbly and will float if a spoonful is placed in water.

The dough will be stiff. I knead it in the mixer for a few minutes then stretch a bit by hand.

Let ferment on the counter overnight. In the morning you shape the dough and let it rise for about an hour. During this time I turn the oven on (helps with a warmer environment to rise the dough) and start the water boiling.

Puffy bagels ready for boiling

When the bagels have risen about an hour and are puffy, they are ready to boil. Boil 2 minutes on each side. Flip them over and give them another 2 minutes in the boiling water bath. The small amount of sugar in the water bath will help ensure that shiny, chewy crust.

Then remove from the water bath, dip or sprinkle toppings and bake.

First try.
Second batch.

Fresh bagels in almost the same time as waiting in line on a Saturday morning at Noah’s! Same chewy, crunchy texture, pure ingredients from your home kitchen!

Update: I just used the same recipe but substituted the Turkey Red hard red wheat for the bread flour. I added two tablespoons of vital wheat gluten.

Out of the boiling water bath and ready to bake.
Whole Wheat Bagels, rose pretty much as the white flour version did.

Turkey Red Wheat

I just tried an heirloom wheat, Turkey Red, which is hard red winter wheat, using the Soft Whole Wheat Sandwich Bread recipe from an earlier post. This recipe has become my standard whole wheat bread for morning toast. I learned about Turkey Red when I was searching for information about the differences between red winter wheat and red spring wheat. My favorite wheat for this bread is Bronze Chief from Wheat Montana. Mountain Peoples Coop used to carry this grain company’s products but Azure Standard does not at this time.

Back to Turkey Red. This grain reportedly came to Kansas in the 1870s with Russian Mennonite immigrants and soon became the dominant wheat produced in the area. Even today the more modern wheat varieties can be traced to this type of wheat. Here is more information about this wheat from the Kansas Historical Society site: https://www.kshs.org/kansapedia/turkey-red-wheat/16789

Overnight fermentation bulked up nicely.
Shaped and placed in pan for second rise.
Nice high rise, better get this in the oven before it overflows the pan!
Checking the temperature after 35 minutes should be over 200 degrees, so back in the oven for 20 minutes
The finished loaf! And the rise rivals that of Bronze Chief.

Whole Wheat Sandwich Bread

I was on the lookout for a whole wheat sandwich bread that I could use for breakfast toast, the great big soft loaf of bread that I made most school days while my children were growing up. I’ve lost that original recipe but had the look and feel and taste of that loaf in mind. I wanted it to be a sourdough for better nutrition and help with my blood sugar and I wanted it to be mostly whole wheat. I found a recipe that looked pretty close, but it wasn’t a sourdough recipe. So I did what any sourdough home researcher would do: I experimented until it worked.

Here’s the original post that I used: https://bakingamoment.com/soft-whole-wheat-bread/

from the Baking a Moment blog site. I made these changes: 1/2 cup sourdough starter instead of the yeast. I add a 1/4 cup vital wheat gluten. I mix this bread at night, give it a few stretches and let it ferment overnight. In the morning I shape it and let it rise from 1-2 hours and then bake it.

And here is a favorite breakfast starring this whole wheat sourdough:

Sourdough Starter: The Beginning of Everything

Welcome to this new blog for RHC Women to chat about Sourdough baking (and other things). Feel free to comment about any post or start another line of conversation! This is our blog!

For this first post, let’s start at the very beginning. Everything sourdough begins with sourdough starter. Your baked goods will only turn out well with an active starter that has the power to rise bread. Unless of course, you are using sourdough discard for some other baked goods, but that would be getting ahead of the story.

There are lots and lots of posts on internet blogs about how to start, feed, and bake with sourdough starters. There are lots of grains and recipes you might use to make a starter. King Arthur flour has a good blog site that describes this process https://www.kingarthurbaking.com/recipes/sourdough-starter-recipe

Active sourdough starter will be bubbly and thick

So that it has the power to raise heavy bread dough.

Making a Sourdough Starter

This starter in the photo is about a year old. Yup, it’s a Covid baby. It lives in the refrigerator and gets fed about once a week when I’m not baking. Do you see how bubbly and eager it is to get baking?

When I’m ready to bake, I take some of it and put it in a clean jar on the kitchen counter. I feed it 1-3 times a day, depending on how soon I want to bake. A general rule of thumb for me is that my starter is fed three times between coming out of the refrigerator and making bread.


But what if you are starting from scratch and you don’t have any starter? Here’s another great blog site to describe this process with photos!

Simple Sourdough Starter

Here’s another great site for information about starting a sourdough starter along with lots of great recipes, Little Spoon Farm. I use this site a lot:
https://littlespoonfarm.com/sourdough-starter-recipe/